COMPUTER TRICKS

Know more about computers and Optimize it

MOBILE TRICKS

Mobile Tips Tricks and hacking

INTERNET TRICKS

Know the hidden things about internet

MULTIMEDIA

PC GAMES

Download pc games

SOFTWARE

Friday, September 16, 2011

Create One-Click Shutdown and Reboot


Create One-Click Shutdown and Reboot Shortcuts:


First, create a shortcut on your desktop by right-clicking on the desktop, choosing New, and then choosing Shortcut. The Create Shortcut Wizard appears. In the box asking for the location of the shortcut, type shutdown. After you create the shortcut, double-clicking on it will shut down your PC.

But you can do much more with a shutdown shortcut than merely shut down your PC. You can add any combination of several switches to do extra duty, like this:

shutdown -r -t 01 -c "Rebooting your PC"
Double-clicking on that shortcut will reboot your PC after a one-second delay and display the message "Rebooting your PC." The shutdown command includes a variety of switches you can use to customize it. Table 1-3 lists all of them and describes their use.

I use this technique to create two shutdown shortcuts on my desktop—one for turning off my PC, and one for rebooting. Here are the ones I use:

shutdown -s -t 03 -c "Bye Bye m8!"
shutdown -r -t 03 -c "Ill be back m8 ;)!"

Switch
What it does

-s
Shuts down the PC.

-l
Logs off the current user.

-t sec
Indicates the duration of delay, in seconds, before performing the action.

-c "messagetext"
Displays a message in the System Shutdown window. A maximum of 127 characters can be used. The message must be enclosed in quotation marks.

-f
Forces any running applications to shut down.

-r
Reboots the PC.


Create An Ftp Server On Your Pc With Serv-u


Requirements:
Serv-U
No-IP.com Website

Quote:
Step 1. Getting a static IP address.
Get a static address for your FTP server. You will want to do this as opposed to using your IP address for several reasons. First, it’s easier keeping up-to-date. Imagine having to change all of your setting every time your IP changed. With No-IP, the No-IP service runs in background on your computer and updates your current IP address with your FTP server’s URL (for example, you get ftp://rkchoolie.serveftp.com). Second reason, you don’t want your IP address posted out there for everyone to see.

1. Go to www.No-IP.com to create a new user account.
2. Fill in the information that is required and the click Register button.
3. Your account has now been created and your account password has been emailed to you.
4. Check your email mailbox and wait for the mail that contains your password
5. Go back to www.No-IP.com and type your email address and password to login to your account.
6. Once in your account, click on Add a host in the left menu
7. Type in the Hostname you want (example: rkchoolie) and pick a Domain from the list (example: ftpserve.com)
8. Check Allow Wildcards and click the Submit button
9. You now have your static address (example: rkchoolie.serveftp.com)
10. Click on your OS link in the Dyn-Update Client in the bottom right menu and follow links to download the client
11. Once downloaded, install the software and type in your email address and password when asked.
12. Finally tick the checkbox near your static address.

You now have a static web address .


Quote:
Step 2. Installing and setting the FTP server
1. Install Serv-U (download HERE)
2. Start Serv-U and use the wizard to setup your ftp.
3. Click next until you're asked for an IP address, leave it blank and then click next.
4. Type the domain name you've just registered above (example: preacher.serveftp.com) in the domain name field and then click Next.
5. You are asked if you want to allow anonymous access, select No and then click next.
6. You are then asked to create a named account, check yes and then click next.
7. Type in the user name you wish for this account (example: Harrie) and click next.
8. Type a password for this account (example: $p3c1aL). For security reasons, try to create a password with some letters, numbers and special characters. Then click next.
9. You will then be asked for the Home directory of the account you just created. Select the directory and then click next.
10. Select yes to lock this account to the Home directory. You want to do this so that the user can not go any further up that his home directory. Click next.
11. The account is now set so click finish.

Quote:
Step 3. Configuring user accounts
1. In the left tree-menu, select the account you've just created and then click on the General tab.
2. Check Hide ‘Hidden’ Files.
3. Check Allow only and enter the number one in the box.
4. Set the Max. download speed to what ever you want. If this is an account that many will be using, set it low to save on your bandwidth. I usually have mine set between 10 – 20. If you leave it blank, users will be able to download from you at full bandwidth.
5. Set the Max no. of users to how many you want to be able to log on at one time. This depends on your connection speed but try these (56 - 1, ISDN - 3, ADSL or cable - 5-6 users.)
6. Now, click on the Dir Access tab.
7. You should see the home folder in there. Highlight it and make your permissions.
8. If you only want users to be able to download check only Read, List, & Inherit.
9. If you want users to be able to upload, but to only one particular folder but not download, click the add button and then select that folder. Now highlight the folder and set these permissions on that folder. Check Write, Append, List, Create, & Inherit. Once you have made the permissions click on the up arrow that is located at the bottom right-hand corner. You want this special upload folder to be list first, before the home folder.
10. If there is a folder that you don’t want anyone to have access to, but it is inside the home folder, then click the add button and then select that folder. Now highlight the folder and make sure that all checkboxes are left. Once you have made the permissions click on the up arrow that is located at the bottom right-hand corner. You want this no access folder to be listed at the very top.
11. There are many other different sets of permissions you can play with. I just covered your basics.
12. Your server is now set!
13. Try logging on with the username and password and see if it works.

Thursday, September 15, 2011

Caught A Virus ?


Caught A Virus?

If you've let your guard down--or even if you haven't--it can be hard to tell if your PC is infected. Here's what to do if you suspect the worst.


Heard this one before? You must run antivirus software and keep it up to date or else your PC will get infected, you'll lose all your data, and you'll incur the wrath of every e-mail buddy you unknowingly infect because of your carelessness.

You know they're right. Yet for one reason or another, you're not running antivirus software, or you are but it's not up to date. Maybe you turned off your virus scanner because it conflicted with another program. Maybe you got tired of upgrading after you bought Norton Antivirus 2001, 2002, and 2003. Or maybe your annual subscription of virus definitions recently expired, and you've put off renewing.

It happens. It's nothing to be ashamed of. But chances are, either you're infected right now, as we speak, or you will be very soon.

For a few days in late January, the Netsky.p worm was infecting about 2,500 PCs a day. Meanwhile the MySQL bot infected approximately 100 systems a minute (albeit not necessarily desktop PCs). As David Perry, global director of education for security software provider Trend Micro, puts it, "an unprotected [Windows] computer will become owned by a bot within 14 minutes."

Today's viruses, worms, and so-called bots--which turn your PC into a zombie that does the hacker's bidding (such as mass-mailing spam)--aren't going to announce their presence. Real viruses aren't like the ones in Hollywood movies that melt down whole networks in seconds and destroy alien spacecraft. They operate in the background, quietly altering data, stealing private operations, or using your PC for their own illegal ends. This makes them hard to spot if you're not well protected.

Is Your PC "Owned?

I should start by saying that not every system oddity is due to a virus, worm, or bot. Is your system slowing down? Is your hard drive filling up rapidly? Are programs crashing without warning? These symptoms are more likely caused by Windows, or badly written legitimate programs, rather than malware. After all, people who write malware want to hide their program's presence. People who write commercial software put icons all over your desktop. Who's going to work harder to go unnoticed?

Other indicators that may, in fact, indicate that there's nothing that you need to worry about, include:

* An automated e-mail telling you that you're sending out infected mail. E-mail viruses and worms typically come from faked addresses.
* A frantic note from a friend saying they've been infected, and therefore so have you. This is likely a hoax. It's especially suspicious if the note tells you the virus can't be detected but you can get rid of it by deleting one simple file. Don't be fooled--and don't delete that file.

I'm not saying that you should ignore such warnings. Copy the subject line or a snippet from the body of the e-mail and plug it into your favorite search engine to see if other people have received the same note. A security site may have already pegged it as a hoax.

Sniffing Out an Infection

There are signs that indicate that your PC is actually infected. A lot of network activity coming from your system (when you're not actually using Internet) can be a good indicator that something is amiss. A good software firewall, such as ZoneAlarm, will ask your permission before letting anything leave your PC, and will give you enough information to help you judge if the outgoing data is legitimate. By the way, the firewall that comes with Windows, even the improved version in XP Service Pack 2, lacks this capability.

To put a network status light in your system tray, follow these steps: In Windows XP, choose Start, Control Panel, Network Connections, right-click the network connection you want to monitor, choose Properties, check "Show icon in notification area when connected," and click OK.

If you're interested in being a PC detective, you can sniff around further for malware. By hitting Ctrl-Alt-Delete in Windows, you'll bring up the Task Manager, which will show you the various processes your system is running. Most, if not all, are legit, but if you see a file name that looks suspicious, type it into a search engine and find out what it is.

Want another place to look? In Windows XP, click Start, Run, type "services.msc" in the box, and press Enter. You'll see detailed descriptions of the services Windows is running. Something look weird? Check with your search engine.

Finally, you can do more detective work by selecting Start, Run, and typing "msconfig" in the box. With this tool you not only see the services running, but also the programs that your system is launching at startup. Again, check for anything weird.

If any of these tools won't run--or if your security software won't run--that in itself is a good sign your computer is infected. Some viruses intentionally disable such programs as a way to protect themselves.

What to Do Next

Once you're fairly sure your system is infected, don't panic. There are steps you can take to assess the damage, depending on your current level of protection.

* If you don't have any antivirus software on your system (shame on you), or if the software has stopped working, stay online and go for a free scan at one of several Web sites. There's McAfee FreeScan, Symantec Security Check, and Trend Micro's HouseCall. If one doesn't find anything, try two. In fact, running a free online virus scan is a good way to double-check the work of your own local antivirus program. When you're done, buy or download a real antivirus program.
* If you have antivirus software, but it isn't active, get offline, unplug wires-- whatever it takes to stop your computer from communicating via the Internet. Then, promptly perform a scan with the installed software.
* If nothing seems to be working, do more research on the Web. There are several online virus libraries where you can find out about known viruses. These sites often provide instructions for removing viruses--if manual removal is possible--or a free removal tool if it isn't. Check out GriSOFT's Virus Encyclopedia, Eset's Virus Descriptions, McAffee's Virus Glossary, Symantec's Virus Encyclopedia, or Trend Micro's Virus Encyclopedia.

A Microgram of Prevention

Assuming your system is now clean, you need to make sure it stays that way. Preventing a breach of your computer's security is far more effective than cleaning up the mess afterwards. Start with a good security program, such Trend Micro's PC-Cillin, which you can buy for $50.

Don't want to shell out any money? You can cobble together security through free downloads, such as AVG Anti-Virus Free Edition, ZoneAlarm (a personal firewall), and Ad-Aware SE (an antispyware tool).

Just make sure you keep all security software up to date. The bad guys constantly try out new ways to fool security programs. Any security tool without regular, easy (if not automatic) updates isn't worth your money or your time.

Speaking of updating, the same goes for Windows. Use Windows Update (it's right there on your Start Menu) to make sure you're getting all of the high priority updates. If you run Windows XP, make sure to get the Service Pack 2 update. To find out if you already have it, right-click My Computer, and select Properties. Under the General tab, under System, it should say "Service Pack 2."

Here are a few more pointers for a virus-free life:

* Be careful with e-mail. Set your e-mail software security settings to high. Don't open messages with generic-sounding subjects that don't apply specifically to you from people you don't know. Don't open an attachment unless you're expecting it.
* If you have broadband Internet access, such as DSL or cable, get a router, even if you only have one PC. A router adds an extra layer of protection because your PC is not connecting directly with the Internet.
* Check your Internet ports. These doorways between your computer and the Internet can be open, in which case your PC is very vulnerable; closed, but still somewhat vulnerable; or stealthed (or hidden), which is safest. Visit Gibson Research's Web site and run the free ShieldsUP test to see your ports' status. If some ports show up as closed--or worse yet, open--check your router's documentation to find out how to hide them.

A very small tutorial for RealMedia


You may find this helpful if you donwload hundreds of short episodes in rm format like me and tired of double-click to open next files.

Very easy. Use notepad to open a new file, type this inside:
file://link to file1
file://link to file2
(type as many as you want)
Close file. Rename it to FileName.rm

Then you`re done!!!!

Ex:
I put my playlist file here: C:\Movies\7VNR
And the movie files are in C:\Movies\7VNR\DragonBall

Then inside my playlist file I`ll have something like this:

file://DragonBall/db134.rm
file://DragonBall/db135.rm
file://DragonBall/db136.rm
file://DragonBall/db137.rm
file://DragonBall/db138.rm

COMPUTER MAINTENANCE


You may not realize it, but your computer and your car have something in common: they both need regular maintenance. No, you don't need to change your computer's oil. But you should be updating your software, keeping your antivirus subscription up to date, and checking for spyware. Read on to learn what you can do to help improve your computer's security.


Getting started

Here are some basics maintenance tasks you can do today to start improving your computer's security. Be sure you make these part of your ongoing maintenance as well.

* Sign up for software update e-mail notices. Many software companies will send you e-mail whenever a software update is available. This is particularly important for your operating system (e.g., Microsoft VV!|VD0VV$® or Macintosh), your antivirus program, and your firewall.
* Register your software. If you still have registration forms for existing software, send them in. And be sure to register new software in the future. This is another way for the software manufacturer to alert you when new updates are available.
* Install software updates immediately.
When you get an update notice, download the update immediately and install it. (Remember, downloading and installing are two separate tasks.)
An ounce of prevention

A few simple steps will help you keep your files safe and clean.

* Step 1: Update your software
* Step 2: Backup your files
* Step 3: Use antivirus software and keep it updated
* Step 4: Change your passwords


Developing ongoing maintenance practices

Now that you've done some ground work, it's time to start moving into longer term maintenance tasks. These are all tasks that you should do today (or as soon as possible) to get started. But for best results, make these a part of a regular maintenance schedule. We recommend setting aside time each week to help keep your computer secure.

* Back up your files. Backing up your files simply means creating a copy of your computer files that you can use in the event the originals are lost. (Accidents can happen.) To learn more read our tips for backing up information.


* Scan your files with up to date antivirus software. Use your antivirus scan tool regularly to search for potential computer viruses and worms. Also, check your antivirus program's user manual to see if you can schedule an automatic scan of your computer. To learn more, read our tips for reducing your virus risk
.
* Change your passwords. Using the same password increases the odds that someone else will discover it. Change all of your passwords regularly (we recommend monthly) to reduce your risk. Also, choose your passwords carefully. To learn more, read our tips for creating stronger passwords
.

Making a schedule

One of the best ways to help protect your computer is to perform maintenance regularly. To help you keep track, we suggest making a regular "appointment" with your computer. Treat it like you would any other appointment. Record it in your datebook or online calendar, and if you cannot make it, reschedule. Remember, you are not only helping to improve your computer, you are also helping to protect your personal information.

Wednesday, September 14, 2011

Convert To Basic And Dynamic Disks In Windows Xp


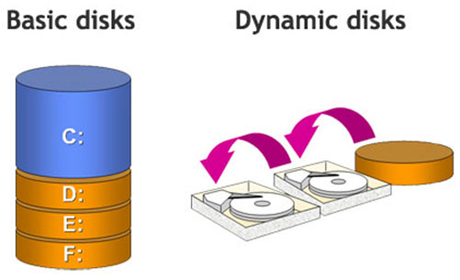
Windows XP Professional supports two types of disk storage: basic and dynamic. Basic disk storage uses partition-oriented disks. A basic disk contains basic volumes (primary partitions, extended partitions, and logical drives).

Dynamic disk storage uses volume-oriented disks, and includes features that basic disks do not, such as the ability to create volumes that span multiple disks (spanned and striped volumes).

General Notes
Before you change a basic disk to a dynamic disk, note these items:


You must have at least 1 megabyte (MB) of free space on any master boot record (MBR) disk that you want to convert. This space is automatically reserved when the partition or volume is created in Microsoft Windows 2000 or Windows XP Professional. However, it may not be available on partitions or volumes that are created in other operating systems.

When you convert to a dynamic disk, the existing partitions or logical drives on the basic disk are converted to simple volumes on the dynamic disk.

After you convert to a dynamic disk, the dynamic volumes cannot be changed back to partitions. You must first delete all dynamic volumes on the disk, and then convert the dynamic disk back to a basic disk. If you want to keep your data, you must first back up or move the data to another volume.

After you convert to a dynamic disk, local access to the dynamic disk is limited to Windows XP Professional and Windows 2000.

If your disk contains multiple installations of Windows XP Professional or Windows 2000, do not convert to a dynamic disk. The conversion operation removes partition entries for all partitions on the disk with the exception of the system and boot volumes for the current operating system.

Dynamic disks are not supported on portable computers or Microsoft Windows XP Home Edition.

Before you change a dynamic disk back to a basic disk, note that all existing volumes must be deleted from the disk before you can convert it back to a basic disk. If you want to keep your data, back up the data, or move your data to another volume.

How to Convert a Basic Disk to a Dynamic Disk

To convert a basic disk to a dynamic disk:

1) Log on as Administrator or as a member of the Administrators group.

2) Click Start, and then click Control Panel.

3) Click Performance and Maintenance, click Administrative Tools, and then double-click Computer Management.

4) In the left pane, click Disk Management.

5) In the lower-right pane, right-click the basic disk that you want to convert, and then click Convert to Dynamic Disk.

NOTE:You must right-click the gray area that contains the disk title on the left side of the Details pane. For example, right-click Disk 0.

6) Select the check box that is next to the disk that you want to convert (if it is not already selected), and then clickOK.

7) Click Details if you want to view the list of volumes in the disk.

8) Click Convert.

9) Click Yes when you are prompted to convert, and then click OK.

How to Convert a Dynamic Disk to a Basic Disk

To change a dynamic disk back to a basic disk:

1) Back up all the data on all the volumes on the disk you want to convert to a basic disk.

2) Log on as Administrator or as a member of the Administrators group.

3) Click Start, and then click Control Panel.

4) Click Performance and Maintenance, click Administrative Tools, and then double-click Computer Management.

5) In the left pane, click Disk Management.

6) Right-click a volume on the dynamic disk that you want to change to a basic disk, and then click Delete Volume.

7) Click Yes when you are prompted to delete the volume.

8) Repeat steps 4 and 5 for each volume on the dynamic disk.

9) After you have deleted all the volumes on the dynamic disk, right-click the dynamic disk that you want to change to a basic disk, and then click Convert to Basic Disk.

NOTE:You must right-click the gray area that contains the disk title on the left side of the Details pane. For example, right-click Disk 1.


Change Your Ip In Less Then 1 Minute


How To: Change Your Ip In Less Then 1 Minute

1. Click on "Start" in the bottom left hand corner of screen
2. Click on "Run"
3. Type in "command" and hit ok

You should now be at an MSDOS prompt screen.

4. Type "ipconfig /release" just like that, and hit "enter"
5. Type "exit" and leave the prompt
6. Right-click on "Network Places" or "My Network Places" on your desktop.
7. Click on "properties"

You should now be on a screen with something titled "Local Area Connection", or something close to that, and, if you have a network hooked up, all of your other networks.

8. Right click on "Local Area Connection" and click "properties"
9. Double-click on the "Internet Protocol (TCP/IP)" from the list under the "General" tab
10. Click on "Use the following IP address" under the "General" tab
11. Create an IP address (It doesn't matter what it is. I just type 1 and 2 until i fill the area up).
12. Press "Tab" and it should automatically fill in the "Subnet Mask" section with default numbers.
13. Hit the "Ok" button here
14. Hit the "Ok" button again

You should now be back to the "Local Area Connection" screen.

15. Right-click back on "Local Area Connection" and go to properties again.
16. Go back to the "TCP/IP" settings
17. This time, select "Obtain an IP address automatically"
tongue.gif 18. Hit "Ok"
19. Hit "Ok" again
20. You now have a new IP address

With a little practice, you can easily get this process down to 15 seconds.

P.S:
This only changes your dynamic IP address, not your ISP/IP address. If you plan on hacking a website with this trick be extremely careful, because if they try a little, they can trace it back


COMMON FTP ERROR CODES


~~~~~~~~~COMMON FTP ERROR CODES~~~~~~~~~~

# Description

110 Restart marker reply. In this case, the text is exact and not left to the particular implementation; it must read: MARK yyyy = mmmm where yyyy is User-process data stream marker, and mmmm server's equivalent marker (note the spaces between markers and "=").

120 Service ready in nnn minutes.

125 Data connection already open; transfer starting.

150 File status okay; about to open data connection.

200 Command okay.

202 Command not implemented, superfluous at this site.

211 System status, or system help reply.

212 Directory status.

213 File status.

214 Help message.On how to use the server or the meaning of a particular non-standard command. This reply is useful only to the human user.

215 NAME system type. Where NAME is an official system name from the list in the Assigned Numbers document.

220 Service ready for new user.

221 Service closing control connection.

225 Data connection open; no transfer in progress.

226 Closing data connection. Requested file action successful (for example, file transfer or file abort).

227 Entering Passive Mode (h1,h2,h3,h4,p1,p2).

230 User logged in, proceed. Logged out if appropriate.

250 Requested file action okay, completed.

257 "PATHNAME" created.

331 User name okay, need password.

332 Need account for login.

350 Requested file action pending further information

421 Service not available, closing control connection.This may be a reply to any command if the service knows it must shut down.

425 Can't open data connection.

426 Connection closed; transfer aborted.

450 Requested file action not taken.

451 Requested action aborted. Local error in processing.

452 Requested action not taken. Insufficient storage space in system.File unavailable (e.g., file busy).

500 Syntax error, command unrecognized. This may include errors such as command line too long.

501 Syntax error in parameters or arguments.

502 Command not implemented.

503 Bad sequence of commands.

504 Command not implemented for that parameter.

530 Not logged in.

532 Need account for storing files.

550 Requested action not taken. File unavailable (e.g., file not found, no access).

551 Requested action aborted. Page type unknown.

552 Requested file action aborted. Exceeded storage allocation (for current directory or dataset).

553 Requested action not taken. File name not allowed.

Directx EXPLAINED


 DirectX explained

Ever wondered just what that enigmatic name means?

Gaming and multimedia applications are some of the most satisfying programs you can get for your PC, but getting them to run properly isn’t always as easy as it could be. First, the PC architecture was never designed as a gaming platform. Second, the wide-ranging nature of the PC means that one person’s machine can be different from another. While games consoles all contain the same hardware, PCs don’t: the massive range of difference can make gaming a headache.


To alleviate as much of the pain as possible, Microsoft needed to introduce a common standard which all games and multimedia applications could follow – a common interface between the OS and whatever hardware is installed in the PC, if you like. This common interface is DirectX, something which can be the source of much confusion.

DirectX is an interface designed to make certain programming tasks much easier, for both the game developer and the rest of us who just want to sit down and play the latest blockbuster. Before we can explain what DirectX is and how it works though, we need a little history lesson.

DirectX history
Any game needs to perform certain tasks again and again. It needs to watch for your input from mouse, joystick or keyboard, and it needs to be able to display screen images and play sounds or music. That’s pretty much any game at the most simplistic level.

Imagine how incredibly complex this was for programmers developing on the early pre-Windows PC architecture, then. Each programmer needed to develop their own way of reading the keyboard or detecting whether a joystick was even attached, let alone being used to play the game. Specific routines were needed even to display the simplest of images on the screen or play a simple sound.

Essentially, the game programmers were talking directly to your PC’s hardware at a fundamental level. When Microsoft introduced Windows, it was imperative for the stability and success of the PC platform that things were made easier for both the developer and the player. After all, who would bother writing games for a machine when they had to reinvent the wheel every time they began work on a new game? Microsoft’s idea was simple: stop programmers talking directly to the hardware, and build a common toolkit which they could use instead. DirectX was born.

How it works
At the most basic level, DirectX is an interface between the hardware in your PC and Windows itself, part of the Windows API or Application Programming Interface. Let’s look at a practical example. When a game developer wants to play a sound file, it’s simply a case of using the correct library function. When the game runs, this calls the DirectX API, which in turn plays the sound file. The developer doesn’t need to know what type of sound card he’s dealing with, what it’s capable of, or how to talk to it. Microsoft has provided DirectX, and the sound card manufacturer has provided a DirectX-capable driver. He asks for the sound to be played, and it is – whichever machine it runs on.

From our point of view as gamers, DirectX also makes things incredibly easy – at least in theory. You install a new sound card in place of your old one, and it comes with a DirectX driver. Next time you play your favourite game you can still hear sounds and music, and you haven’t had to make any complex configuration changes.

Originally, DirectX began life as a simple toolkit: early hardware was limited and only the most basic graphical functions were required. As hardware and software has evolved in complexity, so has DirectX. It’s now much more than a graphical toolkit, and the term has come to encompass a massive selection of routines which deal with all sorts of hardware communication. For example, the DirectInput routines can deal with all sorts of input devices, from simple two-button mice to complex flight joysticks. Other parts include DirectSound for audio devices and DirectPlay provides a toolkit for online or multiplayer gaming.

DirectX versions
The current version of DirectX at time of writing is DirectX 9.0. This runs on all versions of Windows from Windows 98 up to and including Windows Server 2003 along with every revision in between. It doesn’t run on Windows 95 though: if you have a machine with Windows 95 installed, you’re stuck with the older and less capable 8.0a. Windows NT 4 also requires a specific version – in this case, it’s DirectX 3.0a.

With so many versions of DirectX available over the years, it becomes difficult to keep track of which version you need. In all but the most rare cases, all versions of DirectX are backwardly compatible – games which say they require DirectX 7 will happily run with more recent versions, but not with older copies. Many current titles explicitly state that they require DirectX 9, and won’t run without the latest version installed. This is because they make use of new features introduced with this version, although it has been known for lazy developers to specify the very latest version as a requirement when the game in question doesn’t use any of the new enhancements. Generally speaking though, if a title is version locked like this, you will need to upgrade before you can play. Improvements to the core DirectX code mean you may even see improvements in many titles when you upgrade to the latest build of DirectX. Downloading and installing DirectX need not be complex, either.

Upgrading DirectX
All available versions of Windows come with DirectX in one form or another as a core system component which cannot be removed, so you should always have at least a basic implementation of the system installed on your PC. However, many new games require the very latest version before they work properly, or even at all.

Generally, the best place to install the latest version of DirectX from is the dedicated section of the Microsoft Web site, which is found at www.microsoft.com/windows/directx. As we went to press, the most recent build available for general download was DirectX 9.0b. You can download either a simple installer which will in turn download the components your system requires as it installs, or download the complete distribution package in one go for later offline installation.

Another good source for DirectX is games themselves. If a game requires a specific version, it’ll be on the installation CD and may even be installed automatically by the game’s installer itself. You won’t find it on magazine cover discs though, thanks to Microsoft’s licensing terms.

Diagnosing problems

Diagnosing problems with a DirectX installation can be problematic, especially if you don’t know which one of the many components is causing your newly purchased game to fall over. Thankfully, Microsoft provides a useful utility called the DirectX Diagnostic Tool, although this isn’t made obvious. You won’t find this tool in the Start Menu with any version of Windows, and each tends to install it in a different place.

The easiest way to use it is to open the Start Menu’s Run dialog, type in dxdiag and then click OK. When the application first loads, it takes a few seconds to interrogate your DirectX installation and find any problems. First, the DirectX Files tab displays version information on each one of the files your installation uses. The Notes section at the bottom is worth checking, as missing or corrupted files will be flagged here.

The tabs marked Display, Sound, Music, Input and Network all relate to specific areas of DirectX, and all but the Input tab provide tools to test the correct functioning on your hardware. Finally, the More Help tab provides a useful way to start the DirectX Troubleshooter, Microsoft’s simple linear problem solving tool for many common DirectX issues.


CHANGE TEXT ON XP START BUTTON


Step 1 - Modify Explorer.exe File

In order to make the changes, the file explorer.exe located at C:\Windows needs to be edited. Since explorer.exe is a binary file it requires a special editor. For purposes of this article I have used Resource Hacker. Resource HackerTM is a freeware utility to view, modify, rename, add, delete and extract resources in 32bit Windows executables and resource files (*.res). It incorporates an internal resource script compiler and decompiler and works on Microsoft Windows 95/98/ME, Windows NT, Windows 2000 and Windows XP operating systems.


Get this from        
http://delphi.icm.edu.pl/ftp/tools/ResHack.zip

The first step is to make a backup copy of the file explorer.exe located at C:\Windows\explorer. Place it in a folder somewhere on your hard drive where it will be safe. Start Resource Hacker and open explorer.exe located at C:\Windows\explorer.exe.

The category we are going to be using is "String Table". Expand it by clicking the plus sign then navigate down to and expand string 37 followed by highlighting 1033. If you are using the Classic Layout rather than the XP Layout, use number 38. The right hand pane will display the stringtable. We’re going to modify item 578, currently showing the word “start” just as it displays on the current Start button.

There is no magic here. Just double click on the word “start” so that it’s highlighted, making sure the quotation marks are not part of the highlight. They need to remain in place, surrounding the new text that you’ll type. Go ahead and type your new entry. In my case I used Click Me!

You’ll notice that after the new text string has been entered the Compile Script button that was grayed out is now active. I won’t get into what’s involved in compiling a script, but suffice it to say it’s going to make this exercise worthwhile. Click Compile Script and then save the altered file using the Save As command on the File Menu. Do not use the Save command – Make sure to use the Save As command and choose a name for the file. Save the newly named file to C:\Windows.


Step 2 – Modify the Registry

!!!make a backup of your registry before making changes!!!

Now that the modified explorer.exe has been created it’s necessary to modify the registry so the file will be recognized when the user logs on to the system. If you don’t know how to access the registry I’m not sure this article is for you, but just in case it’s a temporary memory lapse, go to Start (soon to be something else) Run and type regedit in the Open field. Navigate to:

HKEY_LOCAL_MACHINE\ SOFTWARE\ Microsoft\ Windows NT\ CurrentVersion\ Winlogon

In the right pane, double click the "Shell" entry to open the Edit String dialog box. In Value data: line, enter the name that was used to save the modified explorer.exe file. Click OK.

Close Registry Editor and either log off the system and log back in, or reboot the entire system if that’s your preference. If all went as planned you should see your new Start button with the revised text.[/b]


Tuesday, September 13, 2011

BULLETPROOF FTP SERVER TUTORIAL


thanks to someone for this tut.

Configuring your Bulletproof FTP Server Tutorial

I am not sure where I found this tutorial, It’s been a while…It might even have been here... ..So if it is one of yours, my hat goes off to you once again....

After reading the excellent tutorial on "Creating an FTP" that Norway posted…

(I would suggest reading and following his tutorial first, then following up with this one)

I thought that perhaps this tutorial might be pretty helpful for those interested in knowing how to configure their Bulletproof FTP Server that don't already know how... Here's how to get started…

This is for the BulletProof FTP Server 2.10. However, It should work fine on most following versions as well.

I'm assuming you have it installed and cracked.If not download HERE

Basics
1. Start the program.
2. Click on Setup > Main > General from the pull-down menu.
3. Enter your server name into the 'Server Name' box. Under Connection set the “Max number of users" to any number. This is the limit as to how many users can be on your sever at any time.
4. Click on the 'options' tab of that same panel (on the side)
5. Look at the bottom, under IP Options. Put a check in the box “Refuse Multiple Connections from the same IP”. This will prevent one person from blocking your FTP to others.
6. Also put a check in the 'Blocked Banned IP (instead of notifying client). VERY IMPORTANT! If somebody decides to 'Hammer' (attempt to login numerous times VERY quickly) your server/computer may CRASH if you don't enable this.
7. Click on the 'advanced' tab
8. At the bottom again look at the 'hammering area'
9. Enable 'anti-hammer' and 'do not reply to people hammering' Set it for the following: Block IP 120 min if 5 connections in 60 sec. You can set this at whatever you want to but that is pretty much a standard Click 'OK'

Adding Users
11. Setup > User accounts form pull-down.
12. Right click in the empty 'User Accounts' area on the right: choose 'Add'
13. Enter account name. (ie: logon name)
14. In the 'Access rights' box right click: choose ‘Add’.
15. Browse until you find the directory (folder) you want to share. In the right column you will see a bunch of checkboxes. Put a check in the following ones: Read, Write, Append, Make, List, and +Subdirs. Press 'select'.
16. Enter a password for your new FTP account.
17. Click on 'Miscellaneous' in the left column. Make sure 'Enable Account' is selected. Enable 'Max Number of Users' set it at a number other than zero. 1 for a personal account and more that one for a group account. Enable 'Max. no. of connects per IP' set it at 1

18. Under 'Files' enable 'show relative path' this is a security issue. A FTP client will now not be able to see the ENTIRE path of the FTP. It will only see the path from the main directory. Hide hidden flies as well.
Put a tick in both of these.

Advanced:
You don't need to do any of this stuff, but It will help tweak your server and help you maintain order on it. All of the following will be broken down into small little areas that will tell you how to do one thing at a time.

Changing the Port
The default port is always 21, but you can change this. Many ISPs will routinely do a scan of its own users to find a ftp server, also when people scan for pubs they may scan your IP, thus finding your ftp server. If you do decide to change it many suggest that you make the port over 10,000.
1. Setup > Main > General
2. In the 'Connection' Area is a setting labeled 'Listen on Port Number:'
3. Make it any number you want. That will be your port number.
4. Click 'OK'

Making an 'Upload Only' or 'Download Only' ftp server.
This is for the entire SERVER, not just a user.
1. Setup > Main > Advanced
2. In the advanced window you will have the following options: uploads and downloads, downloads only, and uploads only. By default upload and download will be checked. Change it to whatever you want.
3. Click 'OK’


While you are running your server, usually you will end up spending more time at your computer than you normally do. Don't be afraid to ban IP's. Remember, on your FTP you do as you want.

When you are online you must also select the open server button next to the on-line button which is the on-line Button

You also have to use the actual Numbered ip Address ie: 66.250.216.67

Or even Better yet, get a no-ip.com address


Monday, September 12, 2011

DOWNLOAD TORRENTS WITH IDM OR ANY OTHER DOWNLOAD MANAGER


Follow Below Steps .:
1. Just go to ZBIGZ.COM

2. Register with a valid Email and you will have a free access @ that website.

3. Just grab the Torrent you which to download with IDM or any other download manager ( well this step needs to have IDM or any other download manager installed on your computer )

4. Now just go to any Torrent website and then where its written click to download torrent just right click and click copy link location.

5. Now you have the Link to that torrent now you have to paste that link in the torrific website.

6. After pasting that Link just click GET
7. After clicking GET you will be greeted with another page saying initiate bittorent transmission.
8. Click that button and torrent will start Caching depending on the time it takes when you will have your torrent ready it will be Blue in color and just after clicking that link your download will automatically open in your Download Manager.
9. They have another very exciting feature called Email when caching is complete if you think download is taking lot of time than juts close that website it will automatically mail you the download link to your email from where you can easily check it again and proceed to download.

             --------------------------THAT'S IT----------------------------


Sunday, September 11, 2011

COMPUTER ACRONYMS


ADSL - Asymmetric Digital Subscriber Line
AGP - Accelerated Graphics Port
ALI - Acer Labs, Incorporated
ALU - Arithmetic Logic Unit
AMD - Advanced Micro Devices
APC - American Power Conversion
ASCII - American Standard Code for Information Interchange
ASIC - Application Specific Integrated Circuit
ASPI - Advanced SCSI Programming Interface
AT - Advanced Technology
ATI - ATI Technologies Inc.
ATX - Advanced Technology Extended

--- B ---
BFG - BFG Technologies
BIOS - Basic Input Output System
BNC - Barrel Nut Connector

--- C ---
CAS - Column Address Signal
CD - Compact Disk
CDR - Compact Disk Recorder
CDRW - Compact Disk Re-Writer
CD-ROM - Compact Disk - Read Only Memory
CFM - Cubic Feet per Minute (ft�/min)
CMOS - Complementary Metal Oxide Semiconductor
CPU - Central Processing Unit
CTX - CTX Technology Corporation (Commited to Excellence)

--- D ---

DDR - Double Data Rate
DDR-SDRAM - Double Data Rate - Synchronous Dynamic Random Access Memory
DFI - DFI Inc. (Design for Innovation)
DIMM - Dual Inline Memory Module
DRAM - Dynamic Random Access Memory
DPI - Dots Per Inch
DSL - See ASDL
DVD - Digital Versatile Disc
DVD-RAM - Digital Versatile Disk - Random Access Memory

--- E ---
ECC - Error Correction Code
ECS - Elitegroup Computer Systems
EDO - Extended Data Out
EEPROM - Electrically Erasable Programmable Read-Only Memory
EPROM - Erasable Programmable Read-Only Memory
EVGA - EVGA Corporation

--- F ---
FC-PGA - Flip Chip Pin Grid Array
FDC - Floppy Disk Controller
FDD - Floppy Disk Drive
FPS - Frame Per Second
FPU - Floating Point Unit
FSAA - Full Screen Anti-Aliasing
FS - For Sale
FSB - Front Side Bus

--- G ---
GB - Gigabytes
GBps - Gigabytes per second or Gigabits per second
GDI - Graphical Device Interface
GHz - GigaHertz

--- H ---
HDD - Hard Disk Drive
HIS - Hightech Information System Limited
HP - Hewlett-Packard Development Company
HSF - Heatsink-Fan

--- I ---
IBM - International Business Machines Corporation
IC - Integrated Circuit
IDE - Integrated Drive Electronics
IFS- Item for Sale
IRQ - Interrupt Request
ISA - Industry Standard Architecture
ISO - International Standards Organization

--- J ---
JBL - JBL (Jame B. Lansing) Speakers
JVC - JVC Company of America

- K ---
Kbps - Kilobits Per Second
KBps - KiloBytes per second

--- L ---
LG - LG Electronics
LAN - Local Area Network
LCD - Liquid Crystal Display
LDT - Lightning Data Transport
LED - Light Emitting Diode

--- M ---
MAC - Media Access Control
MB � MotherBoard or Megabyte
MBps - Megabytes Per Second
Mbps - Megabits Per Second or Megabits Per Second
MHz - MegaHertz
MIPS - Million Instructions Per Second
MMX - Multi-Media Extensions
MSI - Micro Star International

--- N ---
NAS - Network Attached Storage
NAT - Network Address Translation
NEC - NEC Corporation
NIC - Network Interface Card

--- O ---
OC - Overclock (Over Clock)
OCZ - OCZ Technology
OEM - Original Equipment Manufacturer

--- P ---
PC - Personal Computer
PCB - Printed Circuit Board
PCI - Peripheral Component Interconnect
PDA - Personal Digital Assistant
PCMCIA - Peripheral Component Microchannel Interconnect Architecture
PGA - Professional Graphics Array
PLD - Programmable Logic Device
PM - Private Message / Private Messaging
PnP - Plug 'n Play
PNY - PNY Technology
POST - Power On Self Test
PPPoA - Point-to-Point Protocol over ATM
PPPoE - Point-to-Point Protocol over Ethernet
PQI - PQI Corporation
PSU - Power Supply Unit

--- R ---
RAID - Redundant Array of Inexpensive Disks
RAM - Random Access Memory
RAMDAC - Random Access Memory Digital Analog Convertor
RDRAM - Rambus Dynamic Random Access Memory
ROM - Read Only Memory
RPM - Revolutions Per Minute

--- S ---
SASID - Self-scanned Amorphous Silicon Integrated Display
SCA - SCSI Configured Automatically
SCSI - Small Computer System Interface
SDRAM - Synchronous Dynamic Random Access Memory
SECC - Single Edge Contact Connector
SODIMM - Small Outline Dual Inline Memory Module
SPARC - Scalable Processor ArChitecture
SOHO - Small Office Home Office
SRAM - Static Random Access Memory
SSE - Streaming SIMD Extensions
SVGA - Super Video Graphics Array
S/PDIF - Sony/Philips Digital Interface

--- T ---
TB - Terabytes
TBps - Terabytes per second
Tbps - Terabits per second
TDK - TDK Electronics
TEC - Thermoelectric Cooler
TPC - TipidPC
TWAIN - Technology Without An Important Name

--- U ---
UART - Universal Asynchronous Receiver/Transmitter
USB - Universal Serial Bus
UTP - Unshieled Twisted Pair

--- V ---
VCD - Video CD
VPN - Virtual Private Network

--- W ---
WAN - Wide Area Network
WTB - Want to Buy
WYSIWYG - What You See Is What You Get

--- X ---
XGA - Extended Graphics Array
XFX - XFX Graphics, a Division of Pine
XMS - Extended Memory Specification
XT - Extended Technology

BEST KEYBOARD SHORTCUTS


Getting used to using your keyboard exclusively and leaving your mouse behind will make you much more efficient at performing any task on any Windows system. I use the following keyboard shortcuts every day:

Windows key  + R = Run menu

This is usually followed by:
cmd = Command Prompt
iexplore + "web address" = Internet Explorer


compmgmt.msc = Computer Management
dhcpmgmt.msc = DHCP Management
dnsmgmt.msc = DNS Management
services.msc = Services
eventvwr = Event Viewer
dsa.msc = Active Directory Users and Computers
dssite.msc = Active Directory Sites and Services
Windows key + E = Explorer

ALT + Tab = Switch between windows

ALT, Space, X = Maximize window

CTRL + Shift + Esc = Task Manager

Windows key + Break = System properties

Windows key + F = Search

Windows key + D = Hide/Display all windows

CTRL + C = copy

CTRL + X = cut

CTRL + V = paste

Also don't forget about the "Right-click" key next to the right Windows key on your keyboard. Using the arrows and that key can get just about anything done once you've opened up any program.


Keyboard Shortcuts

[Alt] and [Esc] Switch between running applications

[Alt] and letter Select menu item by underlined letter

[Ctrl] and [Esc] Open Program Menu

[Ctrl] and [F4] Close active document or group windows (does not work with some applications)

[Alt] and [F4] Quit active application or close current window

[Alt] and [-] Open Control menu for active document

Ctrl] Lft., Rt. arrow Move cursor forward or back one word

Ctrl] Up, Down arrow Move cursor forward or back one paragraph

[F1] Open Help for active application

Windows+M Minimize all open windows

Shift+Windows+M Undo minimize all open windows

Windows+F1 Open Windows Help

Windows+Tab Cycle through the Taskbar buttons

Windows+Break Open the System Properties dialog box


acessability shortcuts

Right SHIFT for eight seconds........ Switch FilterKeys on and off.

Left ALT +left SHIFT +PRINT SCREEN....... Switch High Contrast on and off.

Left ALT +left SHIFT +NUM LOCK....... Switch MouseKeys on and off.

SHIFT....... five times Switch StickyKeys on and off.

NUM LOCK...... for five seconds Switch ToggleKeys on and off.

explorer shortcuts

END....... Display the bottom of the active window.

HOME....... Display the top of the active window.

NUM LOCK+ASTERISK....... on numeric keypad (*) Display all subfolders under the selected folder.

NUM LOCK+PLUS SIGN....... on numeric keypad (+) Display the contents of the selected folder.

NUM LOCK+MINUS SIGN....... on numeric keypad (-) Collapse the selected folder.

LEFT ARROW...... Collapse current selection if it's expanded, or select parent folder.

RIGHT ARROW....... Display current selection if it's collapsed, or select first subfolder.


Type the following commands in your Run Box (Windows Key + R) or Start Run

devmgmt.msc = Device Manager
msinfo32 = System Information
cleanmgr = Disk Cleanup
ntbackup = Backup or Restore Wizard (Windows Backup Utility)
mmc = Microsoft Management Console
excel = Microsoft Excel (If Installed)
msaccess = Microsoft Access (If Installed)
powerpnt = Microsoft PowerPoint (If Installed)
winword = Microsoft Word (If Installed)
frontpg = Microsoft FrontPage (If Installed)
notepad = Notepad
wordpad = WordPad
calc = Calculator
msmsgs = Windows Messenger
mspaint = Microsoft Paint
wmplayer = Windows Media Player
rstrui = System Restore
netscp6 = Netscape 6.x
netscp = Netscape 7.x
netscape = Netscape 4.x
waol = America Online
control = Opens the Control Panel
control printers = Opens the Printers Dialog


Internet browser

type in u're adress "google", then press [Right CTRL] and [Enter]
add www. and .com to word and go to it


For Windows XP:

Copy. CTRL+C
Cut. CTRL+X
Paste. CTRL+V
Undo. CTRL+Z
Delete. DELETE
Delete selected item permanently without placing the item in the Recycle Bin. SHIFT+DELETE
Copy selected item. CTRL while dragging an item
Create shortcut to selected item. CTRL+SHIFT while dragging an item
Rename selected item. F2
Move the insertion point to the beginning of the next word. CTRL+RIGHT ARROW
Move the insertion point to the beginning of the previous word. CTRL+LEFT ARROW
Move the insertion point to the beginning of the next paragraph. CTRL+DOWN ARROW
Move the insertion point to the beginning of the previous paragraph. CTRL+UP ARROW
Highlight a block of text. CTRL+SHIFT with any of the arrow keys
Select more than one item in a window or on the desktop, or select text within a document. SHIFT with any of the arrow keys
Select all. CTRL+A
Search for a file or folder. F3
View properties for the selected item. ALT+ENTER
Close the active item, or quit the active program. ALT+F4
Opens the shortcut menu for the active window. ALT+SPACEBAR
Close the active document in programs that allow you to have multiple documents open simultaneously. CTRL+F4
Switch between open items. ALT+TAB
Cycle through items in the order they were opened. ALT+ESC
Cycle through screen elements in a window or on the desktop. F6
Display the Address bar list in My Computer or Windows Explorer. F4
Display the shortcut menu for the selected item. SHIFT+F10
Display the System menu for the active window. ALT+SPACEBAR
Display the Start menu. CTRL+ESC
Display the corresponding menu. ALT+Underlined letter in a menu name
Carry out the corresponding command. Underlined letter in a command name on an open menu
Activate the menu bar in the active program. F10
Open the next menu to the right, or open a submenu. RIGHT ARROW
Open the next menu to the left, or close a submenu. LEFT ARROW
Refresh the active window. F5
View the folder one level up in My Computer or Windows Explorer. BACKSPACE
Cancel the current task. ESC
SHIFT when you insert a CD into the CD-ROM drive Prevent the CD from automatically playing.

Use these keyboard shortcuts for dialog boxes:

To Press
Move forward through tabs. CTRL+TAB
Move backward through tabs. CTRL+SHIFT+TAB
Move forward through options. TAB
Move backward through options. SHIFT+TAB
Carry out the corresponding command or select the corresponding option. ALT+Underlined letter
Carry out the command for the active option or button. ENTER
Select or clear the check box if the active option is a check box. SPACEBAR
Select a button if the active option is a group of option buttons. Arrow keys
Display Help. F1
Display the items in the active list. F4
Open a folder one level up if a folder is selected in the Save As or Open dialog box. BACKSPACE

If you have a Microsoft Natural Keyboard, or any other compatible keyboard that includes the Windows logo key and the Application key , you can use these keyboard shortcuts:


Display or hide the Start menu. WIN Key
Display the System Properties dialog box. WIN Key+BREAK
Show the desktop. WIN Key+D
Minimize all windows. WIN Key+M
Restores minimized windows. WIN Key+Shift+M
Open My Computer. WIN Key+E
Search for a file or folder. WIN Key+F
Search for computers. CTRL+WIN Key+F
Display Windows Help. WIN Key+F1
Lock your computer if you are connected to a network domain, or switch users if you are not connected to a network domain. WIN Key+ L
Open the Run dialog box. WIN Key+R
Open Utility Manager. WIN Key+U

accessibility keyboard shortcuts:

Switch FilterKeys on and off. Right SHIFT for eight seconds
Switch High Contrast on and off. Left ALT+left SHIFT+PRINT SCREEN
Switch MouseKeys on and off. Left ALT +left SHIFT +NUM LOCK
Switch StickyKeys on and off. SHIFT five times
Switch ToggleKeys on and off. NUM LOCK for five seconds
Open Utility Manager. WIN Key+U

shortcuts you can use with Windows Explorer:


Display the bottom of the active window. END
Display the top of the active window. HOME
Display all subfolders under the selected folder. NUM LOCK+ASTERISK on numeric keypad (*)
Display the contents of the selected folder. NUM LOCK+PLUS SIGN on numeric keypad (+)
Collapse the selected folder. NUM LOCK+MINUS SIGN on numeric keypad (-)
Collapse current selection if it's expanded, or select parent folder. LEFT ARROW
Display current selection if it's collapsed, or select first subfolder. RIGHT ARROW


A BASIC GUIDE TO THE INTERNET


The Internet is a computer network made up of thousands of networks worldwide. No one knows exactly how many computers are connected to the Internet. It is certain, however, that these number in the millions.

No one is in charge of the Internet. There are organizations which develop technical aspects of this network and set standards for creating applications on it, but no governing body is in control. The Internet backbone, through which Internet traffic flows, is owned by private companies.

All computers on the Internet communicate with one another using the Transmission Control Protocol/Internet Protocol suite, abbreviated to TCP/IP. Computers on the Internet use a client/server architecture. This means that the remote server machine provides files and services to the user's local client machine. Software can be installed on a client computer to take advantage of the latest access technology.

An Internet user has access to a wide variety of services: electronic mail, file transfer, vast information resources, interest group membership, interactive collaboration, multimedia displays, real-time broadcasting, shopping opportunities, breaking news, and much more.

The Internet consists primarily of a variety of access protocols. Many of these protocols feature programs that allow users to search for and retrieve material made available by the protocol.


--------------------------------------------------------------------------------

COMPONENTS OF THE INTERNET

--------------------------------------------------------------------------------

WORLD WIDE WEB
The World Wide Web (abbreviated as the Web or WWW) is a system of Internet servers that supports hypertext to access several Internet protocols on a single interface. Almost every protocol type available on the Internet is accessible on the Web. This includes e-mail, FTP, Telnet, and Usenet News. In addition to these, the World Wide Web has its own protocol: HyperText Transfer Protocol, or HTTP. These protocols will be explained later in this document.

The World Wide Web provides a single interface for accessing all these protocols. This creates a convenient and user-friendly environment. It is no longer necessary to be conversant in these protocols within separate, command-level environments. The Web gathers together these protocols into a single system. Because of this feature, and because of the Web's ability to work with multimedia and advanced programming languages, the Web is the fastest-growing component of the Internet.

The operation of the Web relies primarily on hypertext as its means of information retrieval. HyperText is a document containing words that connect to other documents. These words are called links and are selectable by the user. A single hypertext document can contain links to many documents. In the context of the Web, words or graphics may serve as links to other documents, images, video, and sound. Links may or may not follow a logical path, as each connection is programmed by the creator of the source document. Overall, the Web contains a complex virtual web of connections among a vast number of documents, graphics, videos, and sounds.

Producing hypertext for the Web is accomplished by creating documents with a language called HyperText Markup Language, or HTML. With HTML, tags are placed within the text to accomplish document formatting, visual features such as font size, italics and bold, and the creation of hypertext links. Graphics and multimedia may also be incorporated into an HTML document. HTML is an evolving language, with new tags being added as each upgrade of the language is developed and released. The World Wide Web Consortium (W3C), led by Web founder Tim Berners-Lee, coordinates the efforts of standardizing HTML. The W3C now calls the language XHTML and considers it to be an application of the XML language standard.

The World Wide Web consists of files, called pages or home pages, containing links to documents and resources throughout the Internet.

The Web provides a vast array of experiences including multimedia presentations, real-time collaboration, interactive pages, radio and television broadcasts, and the automatic "push" of information to a client computer. Programming languages such as Java, JavaScript, Visual Basic, Cold Fusion and XML are extending the capabilities of the Web. A growing amount of information on the Web is served dynamically from content stored in databases. The Web is therefore not a fixed entity, but one that is in a constant state of development and flux.

For more complete information about the World Wide Web, see Understanding The World Wide Web.

E-MAIL
Electronic mail, or e-mail, allows computer users locally and worldwide to exchange messages. Each user of e-mail has a mailbox address to which messages are sent. Messages sent through e-mail can arrive within a matter of seconds.

A powerful aspect of e-mail is the option to send electronic files to a person's e-mail address. Non-ASCII files, known as binary files, may be attached to e-mail messages. These files are referred to as MIME attachments.MIME stands for Multimedia Internet Mail Extension, and was developed to help e-mail software handle a variety of file types. For example, a document created in Microsoft Word can be attached to an e-mail message and retrieved by the recipient with the appropriate e-mail program. Many e-mail programs, including Eudora, Netscape Messenger, and Microsoft Outlook, offer the ability to read files written in HTML, which is itself a MIME type.

TELNET
Telnet is a program that allows you to log into computers on the Internet and use online databases, library catalogs, chat services, and more. There are no graphics in Telnet sessions, just text. To Telnet to a computer, you must know its address. This can consist of words (locis.loc.gov) or numbers (140.147.254.3). Some services require you to connect to a specific port on the remote computer. In this case, type the port number after the Internet address. Example: telnet nri.reston.va.us 185.

Telnet is available on the World Wide Web. Probably the most common Web-based resources available through Telnet have been library catalogs, though most catalogs have since migrated to the Web. A link to a Telnet resource may look like any other link, but it will launch a Telnet session to make the connection. A Telnet program must be installed on your local computer and configured to your Web browser in order to work.

With the increasing popularity of the Web, Telnet has become less frequently used as a means of access to information on the Internet.

FTP
FTP stands for File Transfer Protocol. This is both a program and the method used to transfer files between computers. Anonymous FTP is an option that allows users to transfer files from thousands of host computers on the Internet to their personal computer account. FTP sites contain books, articles, software, games, images, sounds, multimedia, course work, data sets, and more.

If your computer is directly connected to the Internet via an Ethernet cable, you can use one of several PC software programs, such as WS_FTP for Windows, to conduct a file transfer.

FTP transfers can be performed on the World Wide Web without the need for special software. In this case, the Web browser will suffice. Whenever you download software from a Web site to your local machine, you are using FTP. You can also retrieve FTP files via search engines such as FtpFind, located at /http://www.ftpfind.com/. This option is easiest because you do not need to know FTP program commands.

E-MAIL DISCUSSION GROUPS
One of the benefits of the Internet is the opportunity it offers to people worldwide to communicate via e-mail. The Internet is home to a large community of individuals who carry out active discussions organized around topic-oriented forums distributed by e-mail. These are administered by software programs. Probably the most common program is the listserv.

A great variety of topics are covered by listservs, many of them academic in nature. When you subscribe to a listserv, messages from other subscribers are automatically sent to your electronic mailbox. You subscribe to a listserv by sending an e-mail message to a computer program called a listserver. Listservers are located on computer networks throughout the world. This program handles subscription information and distributes messages to and from subscribers. You must have a e-mail account to participate in a listserv discussion group. Visit Tile.net at /http://tile.net/ to see an example of a site that offers a searchablecollection of e-mail discussion groups.

Majordomo and Listproc are two other programs that administer e-mail discussion groups. The commands for subscribing to and managing your list memberships are similar to those of listserv.

USENET NEWS
Usenet News is a global electronic bulletin board system in which millions of computer users exchange information on a vast range of topics. The major difference between Usenet News and e-mail discussion groups is the fact that Usenet messages are stored on central computers, and users must connect to these computers to read or download the messages posted to these groups. This is distinct from e-mail distribution, in which messages arrive in the electronic mailboxes of each list member.

Usenet itself is a set of machines that exchanges messages, or articles, from Usenet discussion forums, called newsgroups. Usenet administrators control their own sites, and decide which (if any) newsgroups to sponsor and which remote newsgroups to allow into the system.

There are thousands of Usenet newsgroups in existence. While many are academic in nature, numerous newsgroups are organized around recreational topics. Much serious computer-related work takes place in Usenet discussions. A small number of e-mail discussion groups also exist as Usenet newsgroups.

The Usenet newsfeed can be read by a variety of newsreader software programs. For example, the Netscape suite comes with a newsreader program called Messenger. Newsreaders are also available as standalone products.

FAQ, RFC, FYI
FAQ stands for Frequently Asked Questions. These are periodic postings to Usenet newsgroups that contain a wealth of information related to the topic of the newsgroup. Many FAQs are quite extensive. FAQs are available by subscribing to individual Usenet newsgroups. A Web-based collection of FAQ resources has been collected by The Internet FAQ Consortium and is available at /http://www.faqs.org/.

RFC stands for Request for Comments. These are documents created by and distributed to the Internet community to help define the nuts and bolts of the Internet. They contain both technical specifications and general information.

FYI stands for For Your Information. These notes are a subset of RFCs and contain information of interest to new Internet users.

Links to indexes of all three of these information resources are available on the University Libraries Web site at /http://library.albany.edu/reference/faqs.html.

CHAT & INSTANT MESSENGING
Chat programs allow users on the Internet to communicate with each other by typing in real time. They are sometimes included as a feature of a Web site, where users can log into the "chat room" to exchange comments and information about the topics addressed on the site. Chat may take other, more wide-ranging forms. For example, America Online is well known for sponsoring a number of topical chat rooms.

Internet Relay Chat (IRC) is a service through which participants can communicate to each other on hundreds of channels. These channels are usually based on specific topics. While many topics are frivolous, substantive conversations are also taking place. To access IRC, you must use an IRC software program.

A variation of chat is the phenomenon of instant messenging. With instant messenging, a user on the Web can contact another user currently logged in and type a conversation. Most famous is America Online's Instant Messenger. ICQ, MSN and Yahoo are other commonly-used chat programs.

Other types of real-time communication are addressed in the tutorial Understanding the World Wide Web.


Twitter Delicious Facebook Digg Stumbleupon Favorites More

 
Back to TOP Creative Commons License
This work is licensed under a Creative Commons Attribution-NoDerivs 3.0 Unported License.